

- Remove the distributor cap and cut a “window” into the side of the distributor cap at the #1 spark plug wire post . The “window” should be large enough to allow easy visual inspection of the position of the distributor rotor at the #1 spark plug wire post. Reinstall the distributor cap.
- Use Tip 12 first to guarantee you’re on #1 TDC.
- Install a ¾” wrench or socket onto the vibration damper retaining bolt. Rotate the engine in a clockwise direction until the #1 cylinder is at top dead center. Align the timing mark on the vibration damper with the “0” degree mark on the front cover timing scale. The tip of the distributor rotor should be near the #1 spark plug wire post.
- Disconnect the distributor electrical connection. Remove the distributor holddown clamp, holddown bolt
 and distributor. Remove the distributor cap and rotor.
 - Place the distributor housing upside down in a soft jaw vise. Scribe a line 1/2 inch from the end of the distributor locating tab. Cut the distributor locating tab at the scribed line with a saw.
- Remove any burrs and metal filings from the distributor. Reinstall rotor.
- If necessary, using a flat blade screwdriver, turn the oil pump gear drive shaft until the slot is slightly past the 11 o’clock position. The oil pump gear drive shaft is accessible through the distributor mounting bore in the engine block. A little tip here. Rather than use a dizzy gasket, use an o ring instead. NAPA #727-2024.

- Visually align the modified locating tab area of the distributor housing with the holddown clamp bolt hole.
- Turn the rotor to the 4 o’clock position.

- Lower the distributor into the engine block until it seats. The rotor should now be very close to the 5 o’clock position.
- Reinstall the distributor cap with the cutout “window”. Rotate the distributor housing until the trailing edge of the distributor rotor tip is just departing from the #1 spark plug wire post terminal .
- Reinstall the distributor holddown clamp and bolt.. Reinspect the position of the rotor to the #1 spark plug wire post to insure that it has not moved.
- Install the new distributor cap, reconnect the distributor electrical connections.


HERE’S WHY DISTRIBUTOR INDEXING IS SO IMPORTANT:
Distributor indexing explained:
For clarification though, that’s not a cam sensor inside the Renix dizzy. It’s there to fire the injectors sequentially with the firing order. You’ll never notice if it went bad because the ECU will try to “guess” where it is and does a heck of a job at it.
As for the “timing”, it is controlled by the ECU. Ever notice how wide the tip of the rotor is? Try and wrap your head around this:
When the ECU yells “Fire” to the ignition control module, where is the rotor in relationship to the dizzy terminal? Not to the terminal yet? Past the terminal too far?
What happens to the spark/secondary ignition strength when it has to jump the Grand Canyon in comparison to shooting from a rotor tip? Poor ignition performance, bucking, jerking, longer crank times.
The factory was aware of this and issued a Technical Service Bulletin on it. This Tip, #13, is a condensed version of that factory TSB. You wouldn’t believe how many we found out of whack when I worked at the dealership. Yours is probably messed up also. RARELY did we find one set accurately.
Use Tip 12 first to guarantee you’re on #1 TDC.
Revised 08-19-19
Hi.
Thank you for all the great information. I am curious about the rotor position. You indicate is at TDC it should be at the trailing edge of the rotor should be at the #1 post. However, the Haynes manual states that it should be the leading edge. Why the discrepancy??
As usual Haynes is wrong about that, just as they are about spark plug wire placement on the distributor cap.
The info I provided is directly from a Jeep Technical Service Bulletin and is proven to work.
Hi Cruiser! Thank you for all these tips! I have a 87 cherokee 4.0. We have a miss. It just happened one morning starting it up and is missing running rough. I have done steps 1-7 and also 23. tip 23 seemed to wake it up but still missing. Also tuned it up basic with cap rotor plugs and wires. I just cut the new cap and indexing the distributor now. But checking your thoughts if the indexing doesn’t fix this miss where would you go next?
At idle, pull plug wires one at a time to isolate the problem missing cylinder.
Hi Cruiser, I am looking for some clarification and I may just be splitting hairs. Distributor Index setting, adjust the distributor so the trailing edge of the rotor is just departing the trailing edge of the spark plug pin in the distributor cap. That is the way I’am adjusted and the motor runs well adjusted like this. Thank you in advance for your time and sharing this knowledge.
You should be good to go!!
I changed my 89 xj 4.0 to this firing order and now it wont even crank. Why would this be? is my firing order different?
What firing order?
When you reference the 4 o’clock position, where is 12 o’clock? This is facing the distributor from the passenger side fender with the #1 cylinder on your right?
It’s looking at the engine from the passenger fender.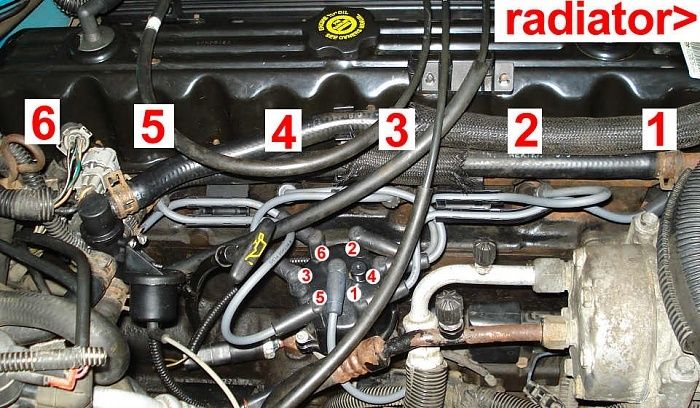
That photo is in with the text on Distributor Indexing.
Hey cruiser. First of all thank you for all your knowledge. It has been of great help. I have a 90 Cherokee Laredo 4.0. last night I decided to complete step 13. I did everything stated other than finding tdc using the finger trick. I turned the crank until I could see the distributor rotor was near #1. Then adjusted to 0 on the timing marks. Then completed the rest of the steps. I have now done this three times and it’s a no start condition every time. Actually had a backfire that sounded like a black powder rifle. Should I do tip 12 to make sure? Any suggestions would be greatly appreciated.
Absolutely yes
After reindexing, where should the timing marks be when checked with a timing light?
About 12*
At an idle?
Why did Jeep put out a technical Service bulletin on distributor indexing? Was there a recall or another reason as to why the distributor needed re-indexing?
thanks in advance
They did it because there were some driveability issues with light throttle bucking.
This explains why. It’s at the bottom of the distributor indexing tip.
Here’s WHY distributor indexing is so important:
Distributor indexing explained
For clarification though, that’s not a cam sensor inside the Renix dizzy. It’s there to fire the injectors sequentially with the firing order. You’ll never notice if it went bad because the ECU will try to “guess” where it is and does a heck of a job at it.
As for the “timing”, it is controlled by the ECU. Ever notice how wide the tip of the rotor is? Try and wrap your head around this:
When the ECU yells “Fire” to the ignition control module, where is the rotor in relationship to the dizzy terminal? Not to the terminal yet? Past the terminal too far?
What happens to the spark/secondary ignition strength when it has to jump the Grand Canyon in comparison to shooting from a rotor tip?
Use Tip 12 first to guarantee you’re on #1 TDC.
I’ve been working through all the steps and have come to this, when indexing the distributor once I have set top dead center the rotor button has about 10 degrees of play in rotation. Brand new distributor, should I take up the slack in clockwise rotation to set it or is this unusual?
Is the rotor loose on the shaft or is the shaft turning?
I discovered the real roll pin securing the gear on the distributor was split into multiple pieces. So I replace the distributor cleaned out the oil pan new oil pan gasket yesterday. Still … Starts to miss back fire and lose power after worming up while driving. Wold the tube headers be heating the intake or injectors up any more than normal? Still scratching my head. Going to go back and check all the new sensors for any bad out of the box ones.
You indexed the distributor again, right?
I wonder if you’re having a fuel delivery issue. Ever checked fuel pressure at the rail?
Don’t worry about the headers causing too much heat.
I checked and discovered the intake manifold bolts were not really tight. One of the bolts on the bottom is missing the factory washer and has a three-quarter inch lock washer underneath a flat washer on it. I keep finding stuff like this that the machine shop I had rebuild the engine did. One TPS bolt was broken off. MAP vac line was plugged off and laying on the intake. Three of the spark plugs were missing the seal washers on them. Missing bolts on the engine being replaced by longer bolts with a stack of washers to make up the difference. Etc. So with that in mind, same mechanic told me the fuel pressure was 50 psi and that the old one was blowing air bubbles through it when he disconnected it from the rail and turn it on. in spite of the headache I’m getting a very good education on the my Jeep. Thank you by the way for me and so many others.
Yes I indexed the distributor when I replaced it.
I’m sorry to hear this. If you need any other help, don’t hesitate to reach out.
Thank you for all of your help. Yes I’m going to go back through everything and check behind him and myself. Tightening the intake exhaust manifold bolts didn’t change anything so I will look into the fuel delivery system. Kind of makes me wonder how he said there was air bubbles coming out with the fuel. He installed a new fuel pump but I think I might go and recheck that. Also the fuel pressure.
i have 89 cheroke with a 98 grand cherokee motor. it had a cracked flex plate. put in nw one and now will only idle, will not excelerate, checked every thing could think of on the list, new fuel pump all vacum connects inj, tps only thing diff is flex plate. took it back out window off by 1/2 in. have ordered in several none match up will newer style with more solid ring work? what am i missing this is 3rd time taking apart, almost mor fun than i need. at 67 yrs old. thanks would sure apreciate ideas. love the site have learned a lot just not enough.
Harold, some of the aftermarket Renix flexplates are faulty. I would look for a good used one.
Is there anyway I could have you call me cruiser54?
I just saw this. What’s your question?
from my understanding of this TSB, we are essentially cutting the locating tab off in order to fine tune the alignment of the cap and rotor correct?
Correct
Hey Cruiser, I’m hoping you can help with this. It’s a renix stroker with an REM and wideband o2. I don’t remember my knock and ign adv from before the stroker, but since it I’ve noticed my ign adv is very high under light throttle and cruising on the highway. Under load/acceleration, it drops back. With light throttle or cruising, it stays between 39 to 45 adv, with load/acceleration it drops back into the 20’s and early 30’s. Knock sensor is reading 0 at idle but goes up to 50’s under load, stays in the 15 to 30 range with light throttle. It starts well and runs good. I’ve indexed the distributor exactly how you show it and it works but feels like it should have more power up top. Would moving the distributor 1 tooth forward and keeping the rotor just departing the #1 cylinder like you show to do, change or effect anything? Engine specs are 68-232-4 comp cam, scat rods, scat crank, balanced everything, racetec 18cc dished pistons, bored .060, ls1 valves & springs, 7120 head ported dished polished, banks header, bosch 4 hole injectors, rollmaster double roller, 1.6 ratio harland sharp roller rockers, 62mm bbk throttle body, 99+ intake, thor cowl intake, wideband o2 piggybacked through REM, REM also running 3 fans, and a flowmaster 40 series. Sorry for the long post for a question and thanks.
Sounds like the knock sensor is doing it’s job. Indexing the distributor is all you want to do in that department.
How many miles are on this engine? Tire size and gearing?
365 miles on the stroker. Stock 3.55 gears and stock tire size. I ended up having a small hole in the intake valve that was letting coolant into cylinder 1 and causing a misfire and running bad. Waiting on another head currently.
Do 12 and 13 have to be done together, or could I only do 12 for now? 13 seems pretty intense. The point of this tip is to get stronger spark by increasing the distance it has to jump? And to fine tune the timing to a post-production spec that was deemed better? Sorry I just can’t quite wrap my head around this one, I think it may be beyond my understanding/experience, but I want to do every tip I can, especially if they are critical!
from the 2nd part of Tip 13:
Here’s WHY distributor indexing is so important:
Distributor indexing explained
For clarification though, that’s not a cam sensor inside the Renix dizzy. It’s there to fire the injectors sequentially with the firing order. You’ll never notice if it went bad because the ECU will try to “guess” where it is and does a heck of a job at it.
As for the “timing”, it is controlled by the ECU. Ever notice how wide the tip of the rotor is? Try and wrap your head around this:
When the ECU yells “Fire” to the ignition control module, where is the rotor in relationship to the dizzy terminal? Not to the terminal yet? Past the terminal too far?
What happens to the spark/secondary ignition strength when it has to jump the Grand Canyon in comparison to shooting from a rotor tip?
Yeah that’s the part I don’t understand, just a lack of knowledge on my part. You are aligning the distributor rotor to be in sequence with the adjustment to #1 TDC you would have just made? Could you explain the purpose of cutting 1/2″ off the tab?
Yes, to obtain correct alignment. The dizzys were not adjustable from the factory and many were not indexed correctly to maximize the spark from rotor to cap. In order to index the dizzy, the locating tab needed to be removed so the housing could rotate in order to get the proper indexing.
Ah, I finally understand! Is there a major difference after completing these tips, or as someone who has just grasped the concept of this, should I just leave well enough alone and let the computer continue guessing?
Take a break for a while!!
You could always just check it though.
You’re right, I should enjoy my Jeep this summer, not just work on it! I will check it before I do anything, but I’ll do that later!
I have a 1989 Cherokee, we’ve been chasing a mid range miss. We indexed the distributor and fixed the stumble but I have a new issue. The flex plate is cracked. I have an aftermarket flex plate but the tone ring is indexed about an inch different than the factory one. Will this affect the performance or will the crank sensor and ecu compensate for the difference? We are in a time crunch and needing the jeep otherwise I wouldn’t even consider it.
First off Nathan, let me apologize for the late response!! WordPress goes along and alerts me on a regular basis of these posts,and then sometimes saves them up for a while. ARGGGHHH!
Anyway, don’t use the flexplate. Get a used one.
Hey Cruiser, revisiting this one because my distributor seal is leaking oil, so I’m considering doing this tip since I have to remove the distributor anyway. How would I check the current indexing, by doing tip 12 and then mark the location of #1 terminal, remove the distributor cap and see if the rotor tip is at or near #1? just don’t wanna do anything if I don’t have to, so thought I should check first before doing the tip. Even if I don’t end up doing tip 13, would you still recommend using an O ring instead of dizzy gasket to fix the oil leak? Thanks in advance!
Use Tip 12 to find top dead center on #1 per the instructions. Then do Tip 13 using an old distributor cap cut up. Yes, use an o-ring as a seal.
Okay, I guess I will just do it. I was gonna cheap out and try to just check it without having to get a new cap, but it’s probably not indexed right, so I’ll just commit. Does the distributor fire clockwise or counter clockwise? just so I know which is the trailing edge of the rotor.
firing order is on the intake manifold.
If you look at the cap and where the plug wires go, you’ll see the rotation. Also, the photo in Tip 13 is a clue.
I did this today my 89 jeep would buck spit and sputter like crazy @ 2000 rpms this fixed it 100% thanks very much brother I really appreciate your wisdom cruiser54.
Glad to hear that!!
Justin was it only at 2000rpm or just in that general range? Mine does it anywhere between like 1800-2400rpm but usually just when I’m under light throttle/light load situations like cruising on the interstate. I’m hoping our symptoms are pretty similar cause I’m praying I’ll have the same outcome as u and this will also fix mine
Gonna make me use my own brain, huh? Fair enough.
Replaced pick up coil did not mark distributor engine will idle but won’t accelerate please help thanks
Cruiser!
Happy holidays!!
I’m stumped and am looking for some help, I’ve got a 90 stroker 4.7 that I recently replaced the lifters and some pushrods after I had a lifter go out and the exhaust valve in cyl%5 bent. Engine runs great up until like 3800 rpm. After that I have a dramatic power loss and it almost seems I have a misfire. I installed a fuel pressure gauge and noticed I’m at 49psi it idle, and with the vacuum unplugged it jumps to around 45psi. I havn’t done any of your tips yet, it’s darn cold out, but I’m wondering if you had any thoughts on this. Any and all advice is helpful.
Thanks!
-Xjnick
Sorry, my valve didn’t bend it was the pushrod on that exhaust valve that bent.
Shoot I also made a mistake on my fuel pressures *39psi at idle, 45psi with vacuum unplugged.
I’ve done EVERYTHING trying to track down the cause of a light throttle/light load misfire on my ’88 XJ (my jeep and I share the same birth year lol) including refresh of the vac lines, changed from NGK iridium plugs to OEM champion copper + wires, cap and button, refreshed all the grounds and ECU+TCU connections, replaced TPS, replaced IACV, reset throttle stop screw, cleaned and oiled filter and also switched out the old 1 hole injectors for the 4 hole Bosch 746’s. Yeah I somewhat fired the parts cannon at it but everything besides the TPS and IACV was done as a tune up kind of deal after I first bought it and replaced the busted leaf springs. Oh I also replaced the MAP sensor which was included in that first round of cannon fodder lol. Still missing like crazy under light load like when trying to hold steady speeds of anything over 60mph which makes interstate driving a nightmare. It doesn’t seem to buck and jerk as hard while it’s misfiring now that it has the 746’s in it, Idk why that would make a difference but it definitely seems like it has softened the bucking and jerking sensation. I guess I’ll finally get to the point here… I’ve got a damn good feeling that indexing my distributor is gonna fix the problem considering I recently checked spark on #1 and it looked a little orange and somewhat weak which I’m hoping is caused by my spark having to jump that canyon cause if so then I’m probably finally nearing the end of this misfire hunt . Certainly wasnt that nice blue snappy sounding spark I’d expect to see with new plugs, wires, etc. I’ve already got my old cap ready to go with its inspection window cut out so I’m going to dive into indexing either tomorrow or the next day, I’ll report back with results asap. I’m praying this does the trick so wish me luck guys! Cruiser I’ve said it a few times before but once again THANK YOU for everything u do! I would have been lost without this website of yours. If there is ever anything my gf and I can do to return the favor please dont hesitate to let us know….
Hey Cruiser, I’ve had some issues with popping and jerking when I take off from stop or when downshifting. I checked the distributor and rotor and I could visibly see that the rotor was not sparking in the correct location on the cap. I had no prior knowledge about the indexing procedure so I bought a new dizzy with cap and rotor, same issue. Thats when I stumbled across this post of yours, and realized I probably just needed to do this indexing procedure.
So my issue is,… If I’m not mistaken the locating tab is what is held by the bolt to keep the distributor from spinning? But we need to remove it and use the original hold down clamp for the dizzy in order to properly index it? Kind of like on a chevy distributor?
Thanks in advance for all the help, your list of Renix era Jeep mods and maintenance have been a life saver.
Yes.
Hello cruiser…quick question on 87’the knock sensor loom..I have a bare wire with no insulation..doesn’t go to anything???I heard you replied years back on a guy with same question…but I think it is factory…Any insight on this would be great…
It’s there for a reason but I don’t know the reason.
Does this indexing also work on the 2.5?
I don’t know.
If you do the cutout window portion at the beginning and the rotor is in the correct location…is there any reason to do the rest of the procedure?
Nope.
Is there a chance not all Renix motors need this done ? I just checked my rotor location with a cut out cap and my rotor trailing tip is at the last 1/4 to 1/8 inch PAST the #1 contact.
I still need to change the seal as its leaking a bit. Any tips on just pulling out distributor to change seal, marking body or rotor alignment.
1/4 to 1/8 is too far past. Should be just a hair past.
Cruiser, I did this whole procedure and it it ran great. I drove for 60 miles and realized I hadn’t reattached the sensor that is attached to the base of the distributor. But it works great. Do I need to attach? Have we basically cut out the need for that sensor doing the timing this way?
Nope. It’s up to you.
So IRT distributor indexing and setting, is the procedure the same with the RENIX 2.5L TBI motor? I just installed a new engine and Ive got the new one running, but its pig rich, and Im wondering if Ive got the distributor a couple teeth off…
No. I don’t think so.
will this mod work on a 91 4.0 HO?
No. It has a different procedure.
What is the procedure for the 91 HO
https://www.angelfire.com/my/fan/dist_index.html
Great thanks I do have an after market cam. From 505 performance its stage 1.5 cam engine seems to run smoothly however it gota rod knock do you think I’ll have to cut the ears off to get the rotor to the exact position currently it’s a little mor than just past the terminal
Thank you! Yes i did and 6 had no difference at all. I also have checked the fuel pressure and is good. Where would you go next?
Also is it normal to have spark jumping all over when you pull these plug wires? haha just checking i thought the boot would contain and insulate the spark better than that.
Unplug # 6 injector. Check how many ohms from the ground wire to the engine block.
Should be 0.
Next, start the Jeep. Using a simple test light, see if it flashes when probing the colored wire in the #6 injector harness.
Yes 0. ohm on the injector plug. I dont have a test light but will try with my meter. Also i checked all the plugs and all were black sooty with just the #6 seemed wet with gas. Also noticing black soot on the ground by the exhaust pipe. Running Really rich computer probably keeping it running?
Meter will work to check positive pulse at injector connector.
Make sure your MAP sensor to throttle body hose isn’t compromised.
Yes the meter is jumping with voltage while running. Yes I checked map sensor as well. I thought CPS but have tested and is good. It doesn’t crank as long but fires right off since the advance timing it. Still got that darn miss. Engine real rough. Any idea from where to go next? I am so thankful for your time and efforts on helping. Thank you sir!
MAP sensor can be good, but hose bad. Makes the MAP sensor think the engine is under a load when it’s not.
Original injectors?
Ok yes very good. I have replaced that hose and checked for leaks and its solid I havent done the upgrade hose for it as of yet. No the injectors had been replaced 6-8 months ago. 4hole but i don’t know the brand. This is my daughters daily driver. She said she tried starting it one morning and it didn’t start and tried it again and it started but running rough with this miss. Was working great the day before.
Could be the injectors are faulty for some reason. Or the incorrect ones. Only use refurbished Volvo 746 injectors. Not chinese new ones. See if you can get a number off one of them.
your thinking injector problem not electrical? I thought maybe putting an old injector on it for #6 maybe?
Says 5KD 566 on them. I got them off ebay and the listing said
For 87-98 Jeep 4.0L Set (6) OEM Bosch 26LB EV1 Upgrade Fuel Injector 0280155832
I put them in on January 2020.
87 to 98 do NOT use the same injectors. I bet that’s your problem.
Ill change these injectors out with the 746’s and let you know how it goes. Thank you sir!
Hi Cruier54 update. I just changed out #6 injector with a working one. no difference. I did just change out all the plugs and all were black but one #5 was wet with gas. I pulled #6 and i cant tell any difference, but #5 has spark all over but no difference when plugged in and unplugged at idle. Any ideal why this would be wet with gas and not firing and running rich like the rest?
Hey there. One last update. My miss was under the valve cover! haha.
I found #5 pushrod out of place. It somehow came out from under the rocker arm. Boy I hope that doesn’t happen again! Any ideas what would cause that? But for now we are up and running and smooth with power! Thank you so much for all the help and all the help getting me to know our Jeep so much better!! Note also love the 5deg advance on the CPS
tip!!
Great news. Is that pushrod bent by chance?
Good call! I looked at it but didn’t put it on a flat surface to check.
That is what I am going to do next pull it back out and double check.
No sir its not. Not that I could see or feel. Strange?
so, you pulled it back out and checked it by rolling it on a flat surface?
How sludgy is your engine inside?
Yes and it rolled straight no wobble. The rod was pretty dirty carbon and such but engine seems pretty clean. Every time I change the oil it always stays clean for a long time and it looked good up top when i had the cover off. I have changed the oil pump rear main seal and put a new pan on it and the oil is always so clean i wonder if the pump is working. haha.
could you blow through the hole in the pushrod?
Yes but I didn’t try to blow through the hole but i looked through it
and saw sunlight. It didn’t have any obstructions at all.
that works.
Hey Cruiser one more thing. As i am running this jeep at idle.
It seems to be going just fine and plenty of pep and fairly smooth, But as its idling about every 15 seconds it stumbles and almost dies then picks back up again. Anything jump out at you on this symptom?
Possible faulty oxygen sensor.
Shoot . When I did the oil pump and such i put new exhaust manifold and new sensor on there as well. I may have to try a new one and see.
Thanks!
double check connections and your work first.
Yes very good will do!!
Thank you.
What do you mean by trailing edge. Try to get my points exact. Should I line up the beginning of the edge of the rotor right before it’s about to come in co fact with #1 spark or right after.
Let the rotor go past the terminal on the cap. That’s the trailing edge of the rotor.
Hey cruiser. First of all thank you for all your knowledge. It has been of great help. I have a 90 Cherokee Laredo 4.0. last night I decided to complete step 13. I did everything stated other than finding tdc using the finger trick. I turned the crank until I could see the distributor rotor was near #1. Then adjusted to 0 on the timing marks. Then completed the rest of the steps. I have now done this three times and it’s a no start condition every time. Actually had a backfire that sounded like a black powder rifle. Any suggestions would be greatly appreciated
Yessir
Is there a procedure to index the distributor for a 94, 96, & 97?
Yes, but I don’t have it at my fingertips.
Hi Cruiser. OO of 1988 AMC XJ Pioneer and is always my ol’ reliable backup daily driver when needed. You mentioned earlier in this thread that without this it might result in an extended crank. This has always been near 3 seconds as far back as I can remember and bugs me especially how the newer cars can restart so quick. Would this help? Any other ways to get it to turn over quicker? Great site! Thanks.
It might help a little. But, you will NEVER get rod pf the longish crank on a Renix system.